
Some of Windows users say they can’t uninstall TweakBit PCSpeedUp, today we’d like see how to correctly uninstall TweakBit PCSpeedUp in Windows, to ensure users could solve their problems, we will list two different method to help.
Common Method to Uninstall TweakBit PCSpeedUp
In Windows, people usually use the Control Panel to uninstall things:
Click the menu bar>> Select Control Panel>> Choose Programs >> Select Programs and Features >> Locate the target program << Double-click to uninstall or right click or choose Uninstall button<< Click Yes to confirm your removal<< Restart your computer now or later.
Delete the Remaining Files
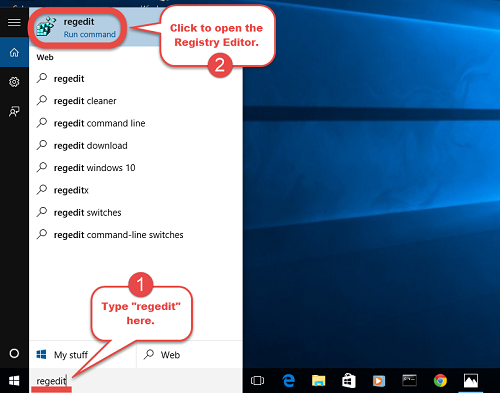
To complete the deleting of its remaining files, you should do these: type “regedit” in the search box to open the Registry Editor >> Search the files in the name of HKEY_CURRENT_USER\Software\(TweakBit PCSuite or the publisher’s name)\ >> Delete it if found > Search the files in the name of HKEY_LOCAL+MACHINE\SOFTWARE\(TweakBit PCSuite or the publisher’s name)\>> Delete it if found
Better Way to Uninstall TweakBit PCSuite
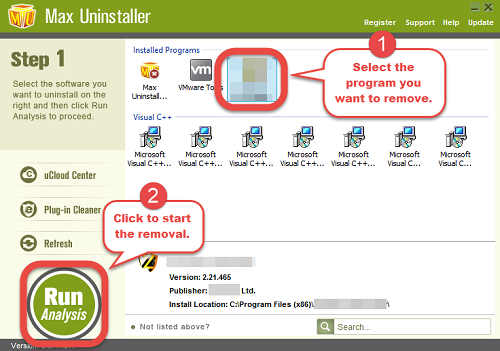
If you get confused for doing these, you may try other method to help with third-party removal tool—Max Uninstaller, a professional uninstaller that was created for Windows, which can uninstall all the installed programs/software in Windows with three simple steps:
1. Open the Max Uninstaller, locate the icon of TweakBit PCSpeedUp in its interface, and easily click the button “Run Analysis”.
2. Wait for a few seconds, then click Complete Uninstall to ensure the removal.
3. Easily click Delete Leftovers button to remove all leftovers that scanned from TweakBit PCSpeedUp in your computer.
When you finish step 3, it means you have finish all the removal of TweakBit PCSpeedUp, go back to step 1, check for trace of TweakBit PCSpeedUp in the interface, you will find nothing about it. Click here to get more details about uninstalling TweakBit PCSuite in Windows.